Friday, March 27, 2009

Plastic Crystal Polishing


Plastic crystals scratch easily. Luckily, they also polish easily--if you have the supplies handy, it takes about 5 minutes to restore most scratched plastic crystals to nearly new condition. This is a crystal that I deliberatly scuffed up to illustrate.


With a few minues work, you can turn it into this. Yes, this is the same crystal, and taken after the first picture.


You will need wet sandpaper in 600 grit, plus 400 and 320 or so for severely scuffed watches. Metal polish of some sort, (I use Wrights silver polish or Brasso) and an applicator of some sort. I use an old fuzzy mouse pad, both to cushion the sandpaper and to apply the metal polish. I've also used the back of a chunk of vinyl cloth--you want something just slightly absorbent, not too coarse, but stiff enough so it doesn't bunch up when you polish with it.


Put the sandpaper on the table, ideally on a slightly padded surface. Sand by moving the watch across the sandpaper. First sand across the direction of the worst scratches. with the coarsest sandpaper you will use. For most crystals, you will need to tip the watch case to get to the outside of the crystal. Pay close attention that you don't sand the case itself. A few drops of water will make the sandpaper last longer without getting clogged with plastic, but don't go overboard, especially if the watch isn't water resistant. Periodically stop and dry the crystal off to inspect. When you almost have the worst scratches sanded out, or sanded as much as you think appropriate (if you have one extremely deep scratch you may consider leaving it partially visible rather than thinning the entire crystal that much), switch to the next finer grade, and sand in a different direction. Once the scratches from the original sandpaper are sanded out, switch to the next finer grade and again sand across the direction of the previous sandpaper. Repeat until you get to the finest paper you will use--I recommend at least 600 grit. 400 will work as the final, but often leaves wavy areas.

You will wind up with an evenly frosted crystal.


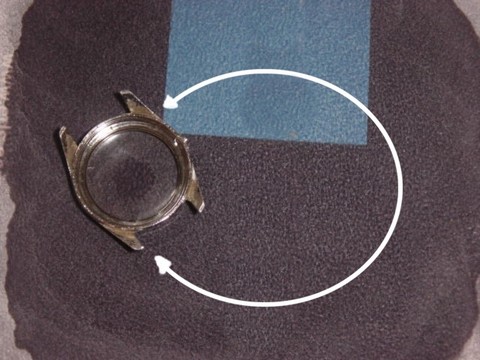
The final step is polish. Put a little polish on your polishing pad if it hasn't been used before, and possibly a drop or two of water. Run the watch in circles across the polish, again rocking to get the edges, and periodically drying and checking the condition. Avoid polishing the case, especially if goldtone.

You will probably wind up with a nice looking crystal, and a bunch of polish stuck in the cracks. A damp toothbrush works well to remove the excess polish. It works better if the bristles are cut to about half length.

I save the pad, and I don't need to put more polish on it most times.

Wednesday, March 25, 2009

Automatic Winding

The first effective automatic wind system was the one used in the Rolex Oyster Perpetual. The Oyster Perpetual was revolutionary--One of the first, if not the first practical water resistant case, combined with the first practical automatic winding system. The original intent of the automatic wind wasn't primarily convenience but rather to maintain water-tightness--By eliminating the need for daily winding the screw-down crown would last longer, and there would be less chance of forgetting to tighten it. This also has the advantage of keeping the watch at a constant state of wind, reducing the potential for isochronal error. (Sorry, I don't own a Rolex to take pictures of, but there is an interesting and not very complimentary illustrated review here)

The Rolex patent covered a 360 degree rotating rotor. Watch companies that wanted automatic winding had to bypass this patent, and so they came up with the bumper wind automatic. The rotor (at the bottom of the movement, marked "seventeen jewels ERNEST BOREL) was set to be free to move in the most common positions, with a simple ratchet turning the center gear which runs through reduction gears to wind the mainspring. Bumpers (shown here in the upper left) restrained it from making a full revolution. Not tremendously different in basic concept, but less efficient than a rotor that can rotate 360 degrees. It does have the advantage of being a bit flatter than a 360 degree rotor. (Click pictures to enlarge) This particular movement was made between 1935 and 1945. Bumper winds continued for some time after the Rolex patents expired, with some models still produced in the 1950's.


Like the bumper wind automatic, the Rolex only wound the watch when the rotor was turning in one direction. In the opposite direction, the system allows the rotor to spin freely. In 1942, the Bidynator was introduced, the first automatic that wound the watch with either direction of the rotor. The bidirectional design means it can stay wound with less arm movement. Note that this watch clearly uses a jewel for the rotor bearing, but remains marked "17 jewels". This means at least one of the standard jewels in the timekeeping section is missing.


Both the Rolex and the Bidynator used a simple post arrangement for the rotor. Rolex still uses a somewhat fragile jeweled post, one of the weaknesses of their design. Eterna was responsible for the next major innovation, a ball bearing rotor in 1948, on the Eternamatic. The Eterna version used 5 ball bearings, and Eterna took this as their trademark. This was another increase in efficiency and durability, and eventually became the standard on most automatics. Shown is an AS 1996, made long after the Eterna patents expired.


In the early 50's, Timex designed a low-cost automatic based on their existing pinlever movement. It used an eccentric cam on the rotor that moved a lever arm back and forth. (Right hand picture is of the same movement, with the rotor removed) The lever had fingers on the other end that engaged a ratchet on each direction, turning an axle which turns a planetary reduction gear, in turn winding the mainspring. Note that this particular movement is the jeweled version, with the unusal D-shaped jewel pins visible in the hole about 1/3 from the top, and 2/3 to the right.


In the late 50's, Seiko introduced their magic lever automatic system--Similar in concept to the Timex system, but greatly simplified. The 4 piece finger system is reduced to a single flexible arm. The diameter of the ratchet wheel is increased, with a simple pinion rather than the planetary reduction of the Timex. The original versions used an eccentric cam on the rotor similar to the Timex. On the 7000 series movements (a 1970 7005 shown), the eccentric is moved off the rotor to a separate gear. Although this appears to increase complexity, it allowed Seiko to eliminate a separate bridge for the automatic wind system, making the movement thinner without affecting durability. Another simplification on most Seiko automatics is the lack of a hand-wind capability, with these parts often modified to adjust the calendar instead.

A teardown of a 7005 movement, with better pictures describing the magic fingers is here.

A teardown of a Swatch automatic, using the same system as most modern Swiss automatics is here.

Sunday, March 22, 2009

Cord Control

We rearranged Wife's desk today. Our desks are homemade, with a fixed monitor shelf and an adjustable main shelf for the keyboard and such. Hers has standard outlet boxes wired in. The desks were built to fit a different area with a little more space, so we shortened her main shelf by 3 inches to fit the new room a bit better. While we had everything out, we decided to rearrange cords. Velcro cable ties are wonderful. These are strips of velcro with hook on one side, loop on the other. I've seen them in the garden department, at Harbor Freight, and at geek supply places. We stuck a bunch of big cup hooks under the desk for cable management, and occasionally a velcro tie to bundle the wires together. Wrap and unwrap as needed. When we were done, she said we still need to do something about the power brick for her speakers--It is large, and falls out of the plug fairly often, especially when the dogs lie under her desk. Velcro ties to the rescue! Poke a hole in the tie, run the screw for the cover plate through, and reattach the cover plate. Wrap the ends of the velcro around the heavy brick, and the dogs can't knock it loose anymore. I did mine, too.

Friday, March 20, 2009

Watch Photography

The key to good photography is lighting. Most often you want diffused, even light rather than point sources. My wife bought a "portable studio" that included a light tent, a background cloth, a tabletop tripod and 2 small daylight filtered halogen lights. This was an improvement, but it was also a pain to set up--In our house it is hard to find a big flat area other than the floor that isn't already occupied. I'm too old to lie on the floor. I made my own version of the studio suited for my work area. My watch workbench has track lighting, giving me 6 movable halogen spotlights. This wasn't meant for photography--it was a cheap way of getting lots of light to the small area where I fix watches. By themselves, the lights are lousy for watch photography--lots of reflections, hard to see detail. However, they did make a good base for lighting a light tent. I took a square wire grid from shelving, draped sheer white fabric over it, and attached a magnet. The magnet sticks the grid to a shelf bracket mounted in my work area, and the sheer fabric diffuses the lights. Sometimes the windows will add undesired reflections. When that happens I clothes pin a dark cloth with a hole for the lens. The hole is cut off center, so I can get various heights depending on how I clip it. The camera's white balance is set for incandescent--otherwise chrome cases are likely to look gold. The kit my wife got included a background cloth, I use it. This setup isn't perfect, but I'm looking for decent results with little effort--it succeeds at that. It is far easier to get good pictures with this setup than with others I have tried, and it sets up and stores quickly. The next addition is probably going to be an adjustable light that I can set up in different positions For a point and shoot without good native macro ability, I velcro a jeweler's loupe to the front of the lens. Focus is essentially done by moving the camera--you have to use the LCD screen. I'm using jeweler's loupes, available from Harbor Freight. a 2 or 3x is about right for a wristwatch, the 10x for individual parts. . In this case, I cut the front half of the loupe off, to avoid shadows on the pictures. My current Kodak has a bigger, better lens than most point and shoot cameras, but that gives its own problems--The lens is too big to attach a loupe, and when holding one in place, the depth of field is about 1mm--If I'm focused on the top of a part, the bottom is out of focus. You can see here that one arm of the balance is almost in focus, the spring below blurry, as is the pivot above. This can be controlled by manually selecting a higher F-stop number, giving a greater depth of field. Cameras with smaller lenses typically have a wider depth of field, so this isn't as much of a problem. A tripod makes all of this much easier, and is essential when the shutter speed gets low, as often happens when I change the f-stop. You don't need a fancy tripod, a tabletop model will work OK, although a floor model gives more flexibility. My floor tripod has a rack to carefully adjust the height, which makes focusing by distance easier. A quick and dirty alternative to the light tent is a flash diffuser. I used to use watch paper held in front of the flash. (watch paper is similar to wrapping tissue) Anything sufficiently translucent will help, even just plain white paper. This eliminates white balance problems, cuts the flash power down so it doesn't overexpose, and softens up the shadows compared to raw flash. The tripod is less necessary to prevent blur from camera shake, but may be useful to assist in holding the position for proper focus.

Ubuntu vs Windows install

I just finished working on a temporary project helping a relatively new company split their computers off their former owner's network. Although this effort was poorly organized and used brute force rather than the available Windows technology, that's not what this post is about. The manual Windows install process is horrible. The install process for most Windows software is horrible, and the horror is magnified when you are doing this over and over. The problem isn't the technology, it is the implementation. The Ubuntu Linux process is far more user-friendly. When installing XP, there are too many places where it halts progress and demands your attention. Worse, these halts aren't grouped together, so you have to keep paying attention to the screen. It might be 30 seconds to the next pause, it might be 15 minutes. The progress meter is nearly useless--It has a very inaccurate guess at the total remaining time, but gives you no clue how long before it needs your attention next. Installing software is just as bad. The typical install would involve clicking on the setup program to launch it. Then there's a sort of welcome page, to tell you that it is about to do what you just asked it to do. Next is a license page that you have to agree to, then a "start installing" button. At the end, there's a "finished" button to click. before moving to the next software. Some stuff needs to be installed as the user. Some needs to be installed as admin. Some stuff needs admin privileges to install, but has to be installed as the user. There is no sudo command, and "run as" isn't a good substitute. User files are scattered all over. I realize the license page is unavoidable with some commercial software, but it should be combined--Running the install program should give a single page with as many options as will comfortably fit--one of them should be "do you agree to the license", another should be "quit when successfully installed". The only way you should have more than one page is if there are too many options to fit, or if certain options depend on others. Adobe was a particularly bad setup--In addition to installing the software, we had the same "welcome, license, install, quit" process for each of 5 additional font packages for different languages. Ubuntu has several versions of their install disks. The standard is a live CD that launches a fairly complete desktop as soon as you boot up with it, with one of the options "install". While installing with this CD, you can actually use the computer for other things. A few older computers that can run the installed version of Linux can't run the live CD--for them is the alternate, which is similar to a Windows install. Tonight I just installed Ubuntu on an older PC, using the "alternate", because it was handy. It asked a handful of questions in the first 5 or 10 minutes, then it started installing. When I came back, the install was done, and it was asking to install updates. Even better, the system is fairly complete at this point--It has the basic set of software that most people need. Adding software is also simple--Find the software in Synaptic, click the box next to it. You might get another box to click to resolve dependencies. After you have chosen every program you want to install, click the "apply" button. Synaptic will install all the programs you selected without any more bother. If you are reinstalling Linux, the user's home folder has the software configuration files for that user--When you restore the home folder, you are restoring all their settings. I've been spoiled by the way EDS and GM had their systems set up--Almost all their computers are less than 3 years old, with carefully managed software and competent admins. I was thinking that Linux was close, but not quite up to Windows in ease of maintenance. I was wrong--In a less carefully controlled environment, Ubuntu is not only equal to Windows, it is considerably superior. I'm pretty sure that if Ubuntu were in a similarly controlled environment, it would be similarly successful.